Few things in gaming are as frustrating as a controller button not responding at the exact moment you need it. Whether you are in the middle of a high-intensity firefight or trying to navigate a complex menu, a unresponsive button can turn an exciting session into a complete headache. If you have ever felt the “mushy” feedback of a button that doesn’t click, or worse, pressed a button that simply didn’t register at all, you aren’t alone.
Most players assume that a controller button fix requires professional intervention or a brand-new purchase, but that is rarely the case. From simple software sync issues to physical obstructions like dust and oil, your controller is likely suffering from a problem that you can resolve at home. In this comprehensive guide, we will break down the most effective ways to diagnose and repair a gamepad button not responding, covering everything from basic cleaning to internal hardware troubleshooting.
Identifying the Problem: Is it Hardware or Software?
Before you start unscrewing your controller, you need to identify where the failure is occurring. Is the button physically stuck, or is it working fine but the console is failing to register the input?
The “Ghost” Input Check
If you are playing on PC, use a dedicated gamepad tester tool to see if the computer registers your input. If the screen shows the button being pressed even though it feels “stuck,” you likely have a hardware obstruction. If the screen shows nothing even when you press firmly, you may have a damaged conductive pad or a failing internal switch.
The Connectivity Test
Sometimes, a controller button fix isn’t about the button at all—it is about the signal. If multiple buttons are failing simultaneously, or if you notice your character walking in circles while you aren’t touching anything, your controller might be suffering from connection interference. Always test your controller with a direct, wired USB connection before assuming the buttons are permanently broken.
The Most Common Culprit: Dirt and Oil Buildup
By far, the most frequent reason for a gamepad button not responding is the accumulation of natural skin oils, dead skin cells, and microscopic dust. Over time, these particles seep into the narrow gap around your buttons, creating a sticky residue that prevents the button from making proper contact with the internal circuit board.
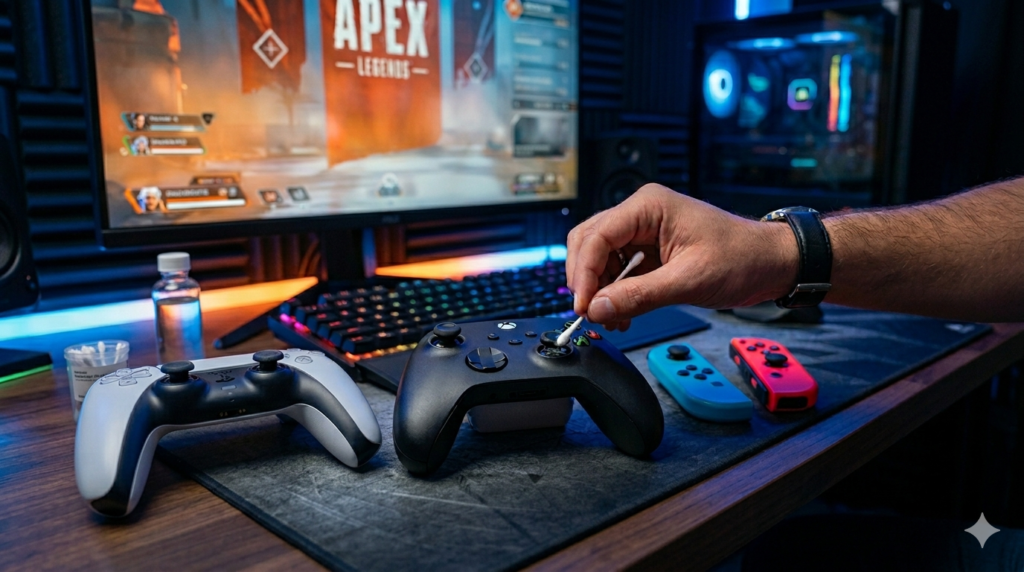
The Isopropyl Alcohol Solution
This is the “gold standard” for cleaning sticky buttons.
- Safety First: Disconnect your controller from all power sources and remove the batteries (if applicable).
- The Damp Q-Tip: Take a Q-tip and dip it into high-concentration Isopropyl alcohol (90% or higher). Make sure the Q-tip is damp, not dripping wet, as you do not want excess liquid seeping into the sensitive electronics.
- Clean the Edges: Gently run the Q-tip around the edge of the problematic button. Press the button down repeatedly while cleaning so the alcohol can reach the inner housing.
- Repeat: Do this several times until you see the grime lifting away. After cleaning, press the button rhythmically for a minute to ensure the alcohol evaporates fully.
This simple cleaning ritual often restores “mushy” buttons to their original, clicky state.
When a Button Is Physically Stuck
If your button feels “trapped” or does not spring back up after you press it, it is likely a mechanical obstruction. A button stuck controller issue is often caused by a spilled drink or a buildup of sugary residue.
Careful Prying
If the button is visibly recessed or uneven, you can use a very thin piece of plastic (like a plastic guitar pick) to gently lift the edge of the button. Never use a metal tool, as this will scratch the plastic shell or potentially puncture the sensitive rubber membrane underneath.
The “Gravity” Fix
Sometimes, a small crumb or piece of grit is preventing the button from popping back up. With the controller off, turn it upside down and tap the back of the case firmly but gently. Often, the vibration is enough to dislodge the obstruction, allowing the spring mechanism to push the button back to its neutral position.
Deep Internal Repair: Opening the Controller
If cleaning the surface doesn’t fix your gamepad button not responding, you may need to open the controller to inspect the internal membranes.
Warning: Proceed carefully, as opening your device can void your warranty.
Accessing the Conductive Pad
Inside every modern controller, there is a rubber membrane with small, conductive contacts. When you press a button, this rubber membrane pushes down against a gold-plated circuit board, completing an electrical circuit.
- Remove the Shell: Using the appropriate screwdriver for your controller model, remove the external screws. Use a pry tool to separate the plastic casing.
- Inspect the Membrane: Once you see the internal circuit board, lift the rubber button pad. If you see dark, greasy residue on the gold contacts or the rubber underside, this is your culprit.
- Clean the Contacts: Use a small amount of Isopropyl alcohol to wipe the gold circuit contacts and the underside of the rubber button pad. Even a tiny smudge of oil can prevent the electrical connection from firing.
- Check for Tears: If the rubber membrane itself is torn or physically cracked, no amount of cleaning will fix it. You will need to order a replacement membrane for your specific controller model. These are inexpensive and widely available online.
Addressing “Dead” Switches (The Tactile Click)
If your controller uses tactile switches (the “clicky” buttons often found on bumpers or shoulder triggers), the problem might be a failed microswitch.
If the button doesn’t provide that distinct “click” sound or feel, the metal spring inside the switch has likely collapsed. This is a more advanced controller button fix that requires soldering. If you are not experienced with a soldering iron, it is often more cost-effective to replace the entire shoulder button module or find a local repair shop to do the work for you.
Software and Calibration Fixes
If your hardware seems to be in perfect condition, the issue might be a software-level “remapping” error.
- Check Input Settings: Sometimes, a game’s internal settings may have accidentally remapped your buttons. Reset your control scheme to “Default” to rule this out.
- Controller Update: Both Xbox and PlayStation controllers receive firmware updates. A glitch in the controller’s internal software can sometimes cause it to stop recognizing certain buttons. Plug your controller into your console and run a firmware check in the device settings menu.
- Driver Reset: On PC, uninstall the controller driver from the Device Manager and reconnect the device. Windows will automatically reinstall the driver, which often clears up weird input lag or non-responsive buttons.
Prevention: Keeping Your Controller Healthy
Now that you know how to perform a controller button fix, the best strategy is to prevent these issues from happening in the first place.
- Avoid Eating and Gaming: It is the oldest rule in the book for a reason. Crumbs and sticky fingers are the fastest way to turn a working controller into a button stuck controller.
- The “Shake” Test: Periodically check your controller by holding it to your ear and giving it a gentle shake. If you hear loose pieces or rattling, something may be broken inside. Catching a loose screw early can save you from a major malfunction later.
- Proper Storage: When not in use, place your controller in a dedicated case or a clean drawer. Storing it loose on a desk where it gathers dust for weeks is a recipe for unresponsive buttons.
Advanced Troubleshooting: When to Replace
If you have cleaned the contacts, replaced the rubber membranes, updated the firmware, and tested the device on multiple platforms, and the button still fails to respond, you are likely dealing with a failure on the motherboard itself. This could be a broken trace or a failed logic chip.
At this stage, you have three options:
- Professional Repair: If the controller is a premium, high-priced model, look for a technician who can perform board-level repairs.
- Parts Controller: If the controller is beyond repair, keep it! The triggers, joysticks, and shell casing can be used as spare parts for your future maintenance needs.
- Upgrade: Sometimes, after years of loyal service, the smartest move is to retire the device. Look for newer models that offer modular components, which make it easier to replace specific buttons without requiring specialized tools.
Conclusion: Don’t Give Up on Your Gear
A gamepad button not responding does not have to be a death sentence for your hardware. Whether it is a simple case of sticky soda residue or a worn-out rubber membrane, most button issues are minor mechanical inconveniences that can be corrected with about 30 minutes of effort and a few basic household supplies.
By maintaining your controller with regular cleaning and proper storage, you significantly extend its lifespan and performance. The next time you find a button stuck controller or a button that refuses to fire, stay calm. Open up your troubleshooting toolkit, start with the simple cleaning methods, and work your way down. In most cases, you will find that your controller has plenty of life left in it—all it needs is a little bit of attention!